If like me, you’ve wound up with an expensive paperweight through careless tinkering and full hardiness than today's your lucky day. I’ll run you through the process of claiming back your hardware and saving you tedious research.
For this guide I’ll be working on my Dell Chromebook 11 (2014: 730-8301), However, this guide transfers to other Chromebooks with a 3.3v SPI flash chip (newer models use a 1.8v chip so be sure to check before proceeding).
Getting Started
Just this Monday I had the wonderful idea of restoring my Chromebook running Galium OS back to stock. I was dissatisfied with Linux as a desktop solution as I always am and was running into heat issues. That day I made a stand and failed miserably, it seemed the flashing process got cut short and I was left with no bios; turning a half hour job into several days.
Here's everything you’ll need to save your Chromebook:
Any compatible bios should work with this guide, however, I’ll be using a stock Chrome OS bios to get my Dell Chromebook back to how it originally was.
Preparing your raspberry Pi
Before touching your dead Chromebook and opening it up we should prepare the Raspberry Pi, which was actually a great source of headache for me. During the flashing process, the latest version of raspbian couldn’t recognise my bios chip, which seemed to be a common issue. To get round this issue, I used the older version: Raspbian Jessie.
When you first boot into the Raspberry Pi you’ll want to issue the command: sudo raspi-config
This’ll present you with a menu that has many configuration settings for your Pi, navigate to:
5 “interfacing options”
P4 “SPI"
choose to enable it.
After we’ll issue the command to update our package list and then proceed to install flashrom to the Pi.
Sudo apt-get update
Sudo apt-get install flashrom
If the install command doesn’t work, you can simply install it manually like I had to do with the following commands:
sudo apt-get install build-essential pciutils usbutils libpci-dev libusb-dev libusb-1.0-0 libusb-1.0-0-dev libftdi1 libftdi-dev zlib1g-dev subversion
svn co https://code.coreboot.org/svn/flashrom/trunk flashrom
cd flashrom
Make
sudo make install
Connecting the Chip

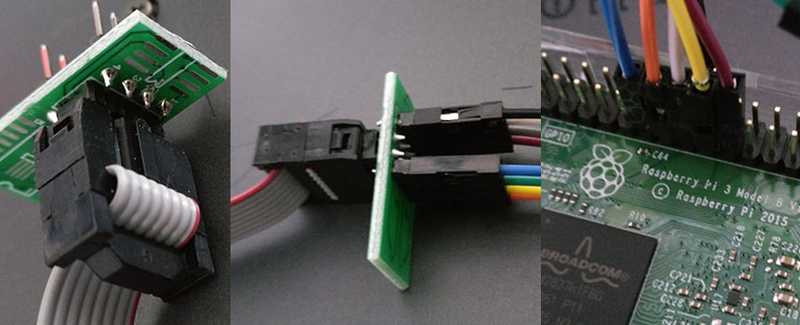
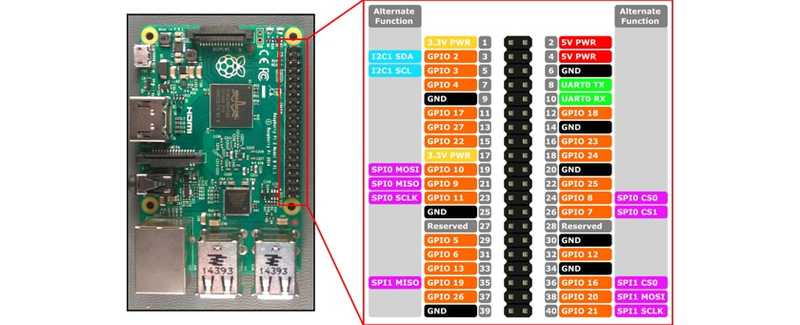
Take your newly bought SOIC clip and connect it to the included board, making sure the red wire corresponds to the number 1. Now is time to make the connections from the clip to your Raspberry Pi’s pins. The table below shows how the pins should connect to each other.
| Pin # | SPI Pin Name | Beagleboard Black | Raspberry Pi |
|---|---|---|---|
| 1 | CS | Pin 17 | 24 |
| 2 | MISO | Pin 21 | 21 |
| 3 | Not Used | Not Used | Not Used |
| 4 | GND | Pin 1 | 25 |
| 5 | MOSI | Pin 18 | 19 |
| 6 | CLK | Pin 22 | 23 |
| 7 | Not Used | Not Used | Not Used |
| 8 | 3.3V | 3.3V PSU RED | 17 |

With your Raspberry Pi ready and waiting let's move on to the troublesome bios. Take the back casing of your Chromebook off and inspect the insides, looking for the Bios chip, it’ll have a small dot in one of the corners identifying pin one. Once identified, clasp the chip with the SOIC clip ensuring a good connection and that the red wire corresponds to the dot.
Flashing Your Chip
Time for the final step in resurrecting your Chromebook from the afterlife. Once all the wires are connected boot into your Raspberry Pi and test the connection by running a command that will attempt to make a copy of the current bios.
sudo flashrom -p linux_spi:dev=/dev/spidev0.0 -r bad_flash.rom
If all went well you’ll have a file called “bad_flash.rom”, if not double check your connection. In my case, I had to reconnect the SOIC clip making sure it was on there properly. Now to begin with the flash, navigate to the directory where you have the bios you wish to install and issue the command below (replacing “bios.bin” with the name of your bios file).
sudo ./flashrom -p linux_spi:dev=/dev/spidev0.0 -w bios.bin
After several minutes, both processes should be complete, giving your Chromebook a new lease on life. Just install the desired OS and you’re all set. For myself, I continued following this guide from step 4 to get me back to stock.